Helping my Framework Laptop reach its destiny
How I re-purposed my Framework as a standalone server for my home-lab.
This is not sponsored by Framework … though I wish it were :)
1. Primary Motivation
I #feelsbad for abusing my lowly NAS -

Its not it’s fault that its owner expected it to run Collabora Online while running all his other services without instantly crashing…
Did I learn anything? Basically a NAS should just do NAS things like worry about storage. Compute should be handled by something else.
Lesson learned.
2. Secondary Motivation
Battery life is an issue with this gen.
For my personal laptop I’d want something that has “all day” battery like the newer gen Intels or Ryzens.
My plan is to snag one of those when prices become more attractive and retrofit it into my now hollow laptop chassis.
Isn’t this the Framework mission?
“Even better, what we’ve done to enable repair also opens up upgradability and customization. This lets you get exactly the product you need and extends usable lifetime too.”
3. Idea
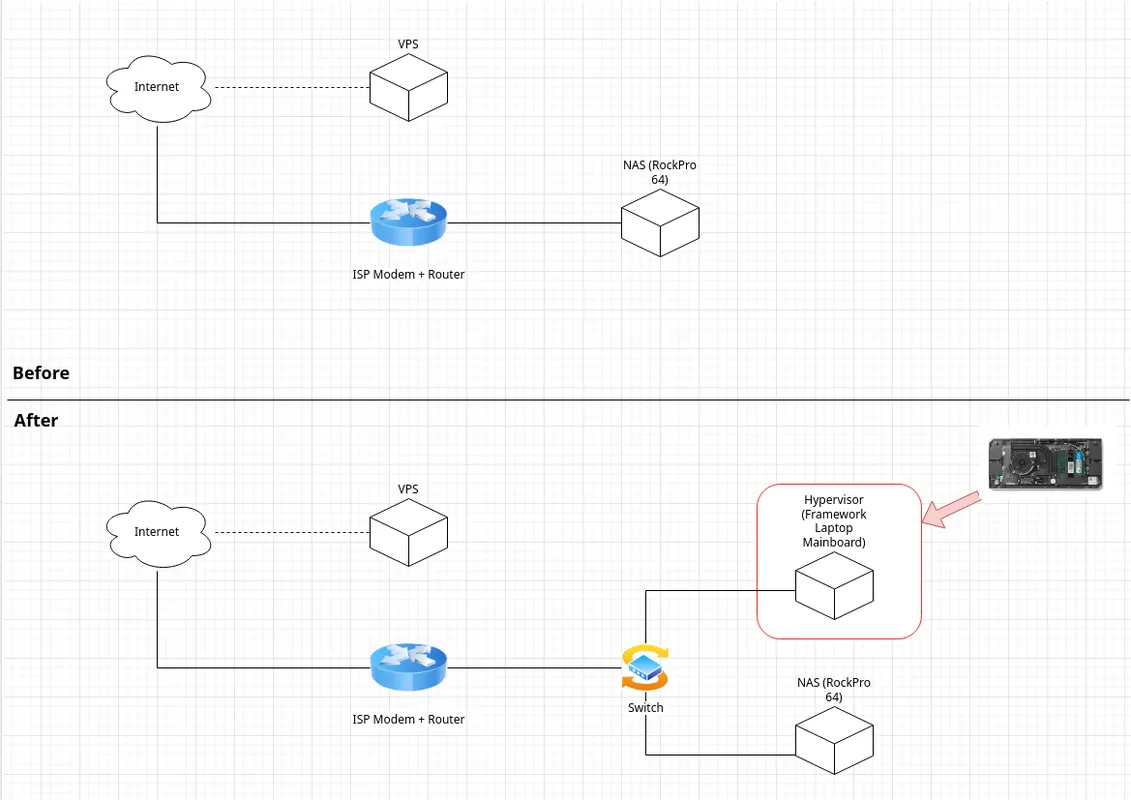
Re-purpose my 99%-of-the-time idle personal Framework laptop which is already overkill for the remaining 1%-of-the-time tasks, to be a hypervisor server.
Setup my home-lab services there, and provide data storage for those services over NFS from my NAS.
I’ll setup a dedicated “workstation” VM for those 1%-of-the-time tasks.
4. Prior to starting!
To avoid making the same mistakes I made, do the following while the mainboard is still in the laptop chassis!

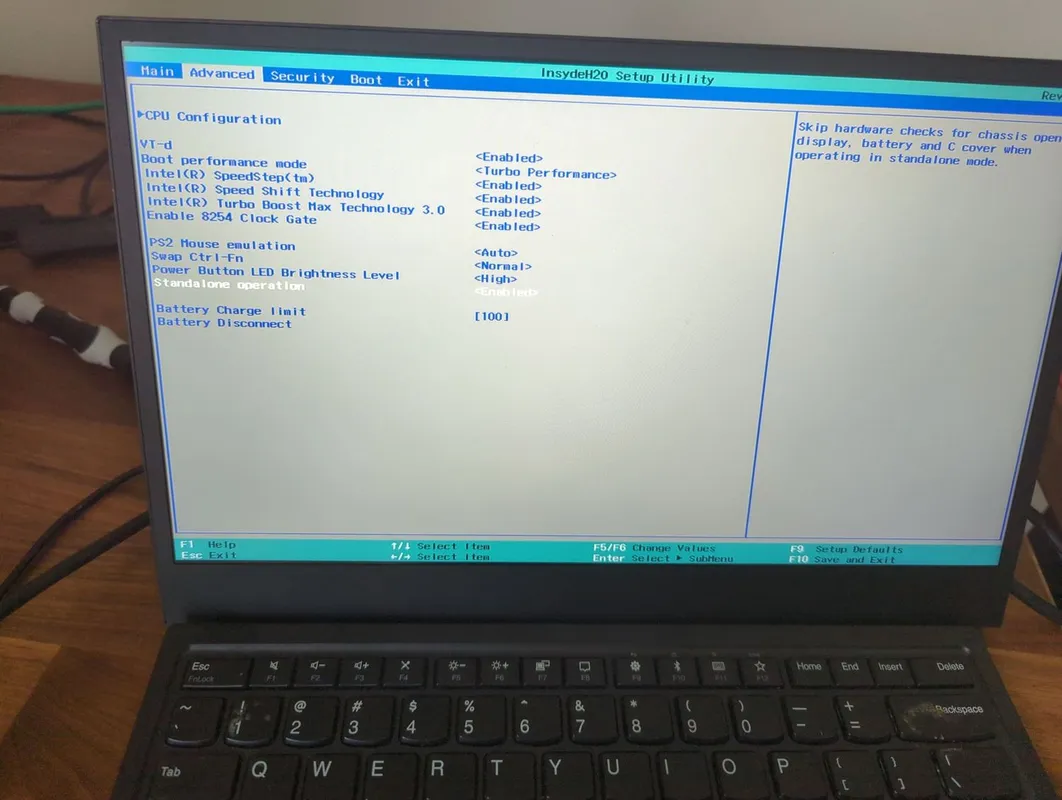
- Update your BIOS firmware to at least 3.17. It is impossible to do so once the battery is un-plugged from the board on older firmwares. I learned this the hard-way. This update will provide the critical options below for this process to be feasible.
- In your BIOS settings, enable options for optimizing CPU performance over battery life.
- In your BIOS settings, enable “Standalone operation”.
- In your BIOS settings, under “Boot” enable the option to power-on on power-attach.
- Install Proxmox VE. Since this will require a screen, and keyboard input, you might as well do it now. See the hypervisor section below.
5. Build
5.1. Server
I’m using my original Framework 13 laptop.
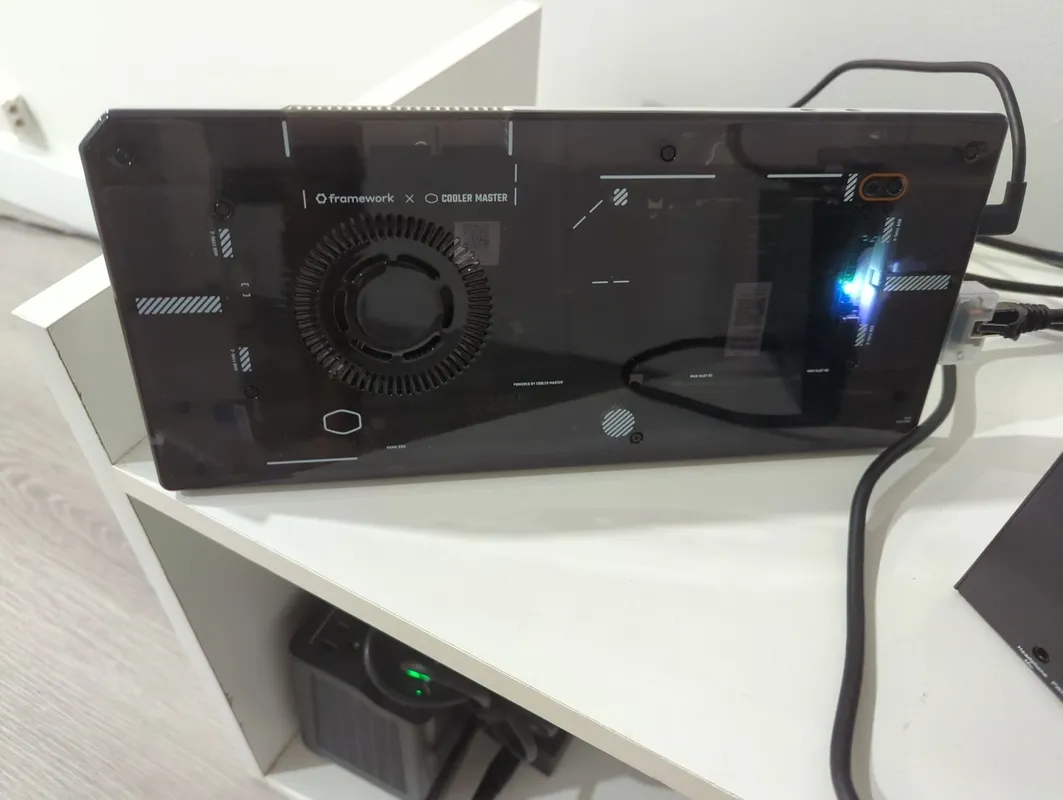
Its an i7-1165G7 - yes a “mobile” CPU. Am I asking for trouble? We’ll see. Its more than powerful enough for me (for now).
Alternatively you could build/use another server.
If you are also using the Framework 13, then you’ll want to make sure that you are running at least BIOS 3.17. See the issues section below about my troubles.
5.2. Case
As you can see above, I opted for the Coolermaster Case because honestly it looks cool.
Alternatively, you could self-print the community 3D case or get someone else to print it.
5.3. Network Connectivity
I opted for the 2.5G ethernet expansion card from Framework.
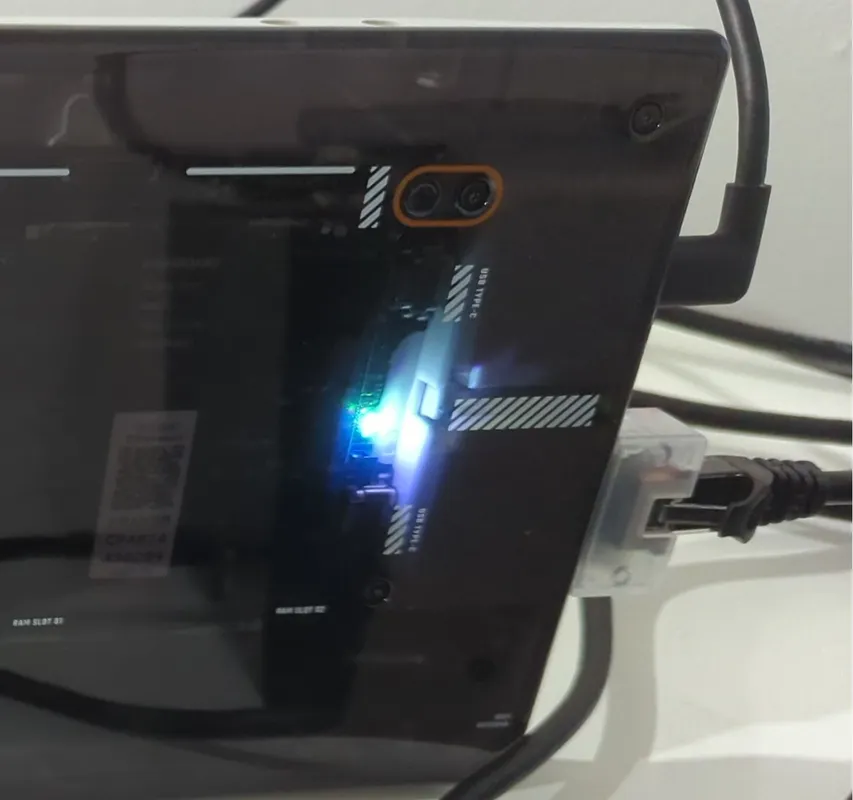
I suppose one could also use a WiFi card, but it makes more sense to go wired in a 24/7 “on” configuration.
Alternatively, most thunderbolt-ethernet dongles should do the job. You’d want to check that there are Linux drivers for it.
Since I host a few publicly accessible services (this blog for example), I also need a public static IP under which an internet user can access these services.
So I opt for a cheap VPS from Racknerd. These are about a $1/mo for a public IPv4 IP, and a decent amount of network bandwidth.

5.4. Storage
5.4.1. for VMs
I used the 1TB NVME drive I had on my Framework.
5.4.2. for Data
You should have a storage solution (NAS) in place already!
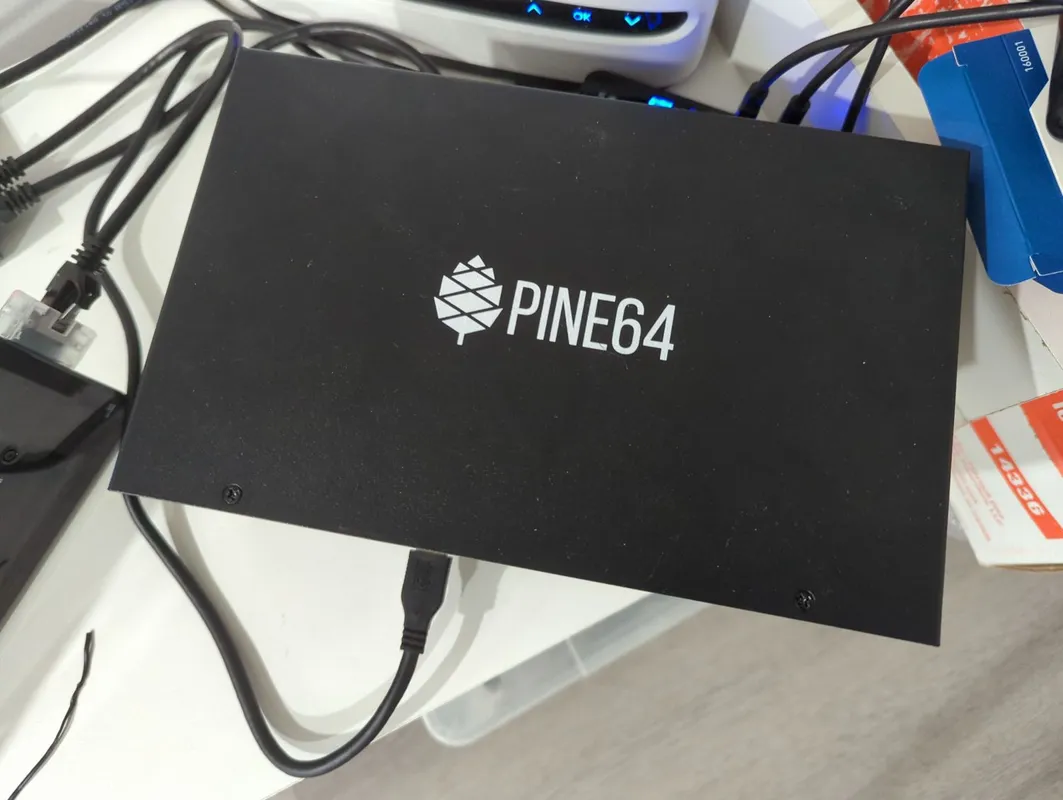
Setting this up is beyond the scope of this post. You can check out my DIY ZFS backed NAS setup here. I’ve had no (storage related) issues with my NAS since its inception over a year ago.
Then when I need to allocate space for a new service I do:
zfs create <pool>/<dataset>
zfs set compression=on/off
zfs set sharenfs="..." sharesmb=".."
Then when the time comes, configure the NFS mount on the client VM that requires access to this data store:
mount -t nfs hostname-of-your-nas:/mnt/pool/dataset /mnt/dataThere are also many options for pre-made NAS appliances such as Synology.
5.5. Power
Highly recommend a UPS such as this.
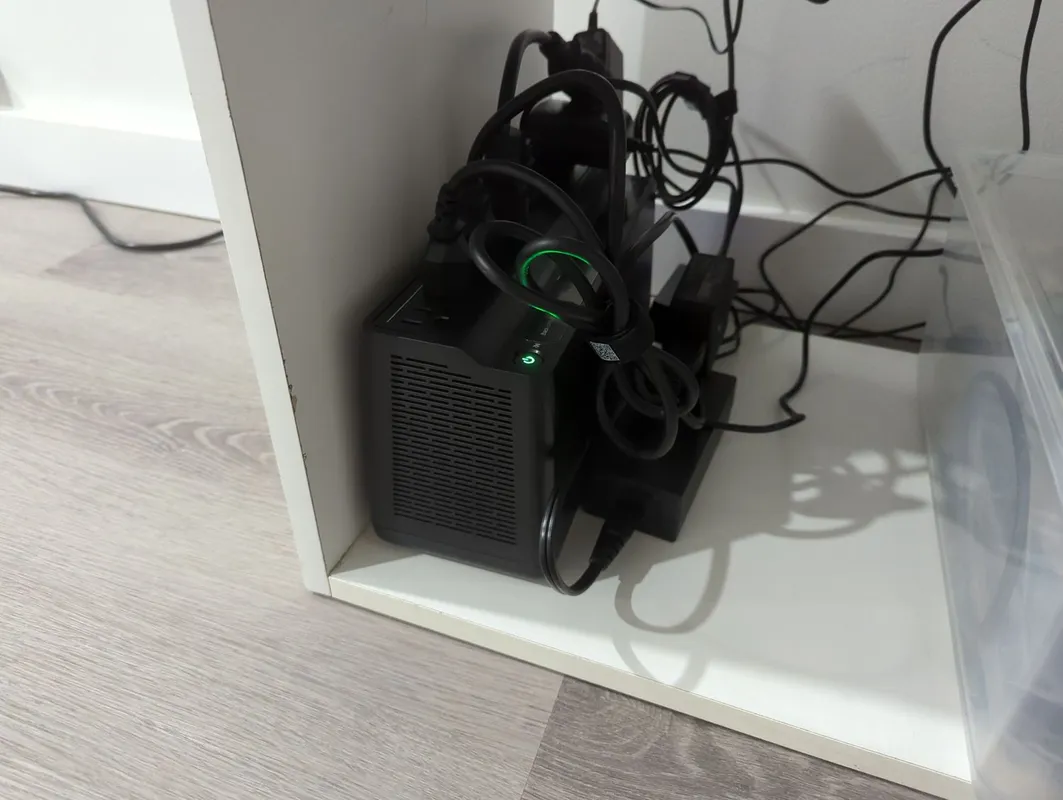
Even if you don’t care about uptime, you should care about data integrity issues resulting from abrupt power-loss.
A UPS should buy you enough time to power things down gracefully.
6. Hypervisor
I opted for Proxmox VE since v8 was just released, I’ve been itching to try it out. Now felt like the right time.
There is also a Terraform provider allowing provisioning of VMs, and LXC Containers through code. Neat!
I recommend you do this before taking the mainboard out of the laptop chassis as you will need to provide keyboard input, as well as see whats going on the screen.
Install it. I just followed the official instructions.
Under your host (mine’s
pve), under System, Network, create a bridgevmbr0with:
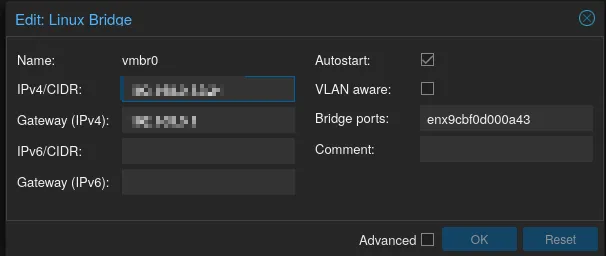
This will make your Proxmox host available in your home network. Set this to something else if you like.
You should also reserve the corresponding IP in your home router for this host.
While you’re here, create another bridge vmbr1 with VLAN Aware checked:
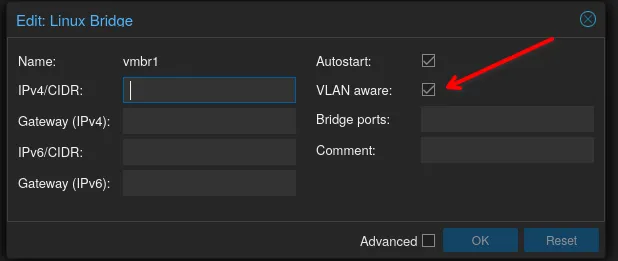
We are going to create our home-lab network primarily onvmbr1. Think ofvmbr0as a management bridge.
7. Network
I always find it best to sort out networking before we start building stuff.
Since I’m basically starting over, I want to do it properly. A few design goals:
- I want segregation of my home-lab services from my non-home-lab hosts (my “workstation” VM for example), as well as the rest of my home network.
- I don’t want to keep track of static IP leases, everything should be DHCP, and DNS.
- I want all traffic to/from my home-lab segment to be encrypted. Non-home-lab traffic does not need to be encrypted.
- I need some way to make these services publicly accessible over the internet.
The first two goals necessitate a virtual firewall/router deployment capable of selectively routing a segment of my network over a VPN.
Here is what I would like:
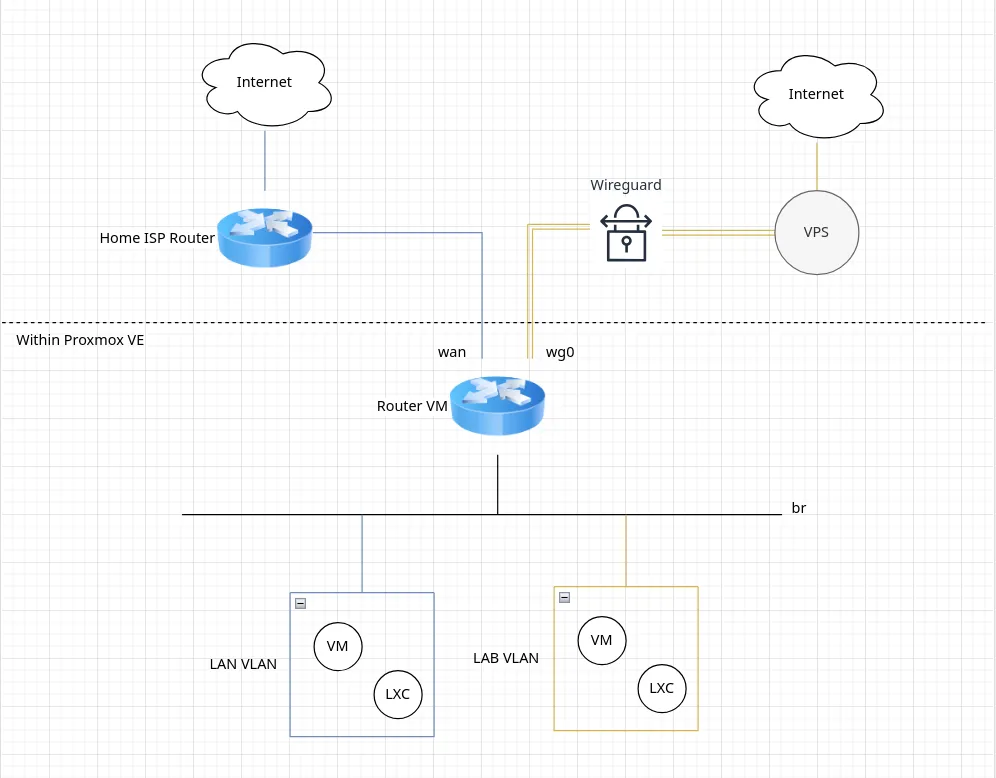
7.1. Goals: 1,2
At first I went with the popular pfSense VM. For a few reasons, I abandoned it quickly.
Then I decided to try out OpenWRT, and boy am I glad I did.
I gave it two networking interfaces, each vbmrX we created earlier:

vmbr0will be used to access our router from the home-network. It will also be how our router gets access to the internet. Aka. WAN.vmbr1will be used to create various subnets for our home-lab. Aka. LAN.
You should reserve another IP in your home router using the MAC address generated for net0. This will be how to access your home-lab router from your home network.I was able to setup a network with a few VLANs:
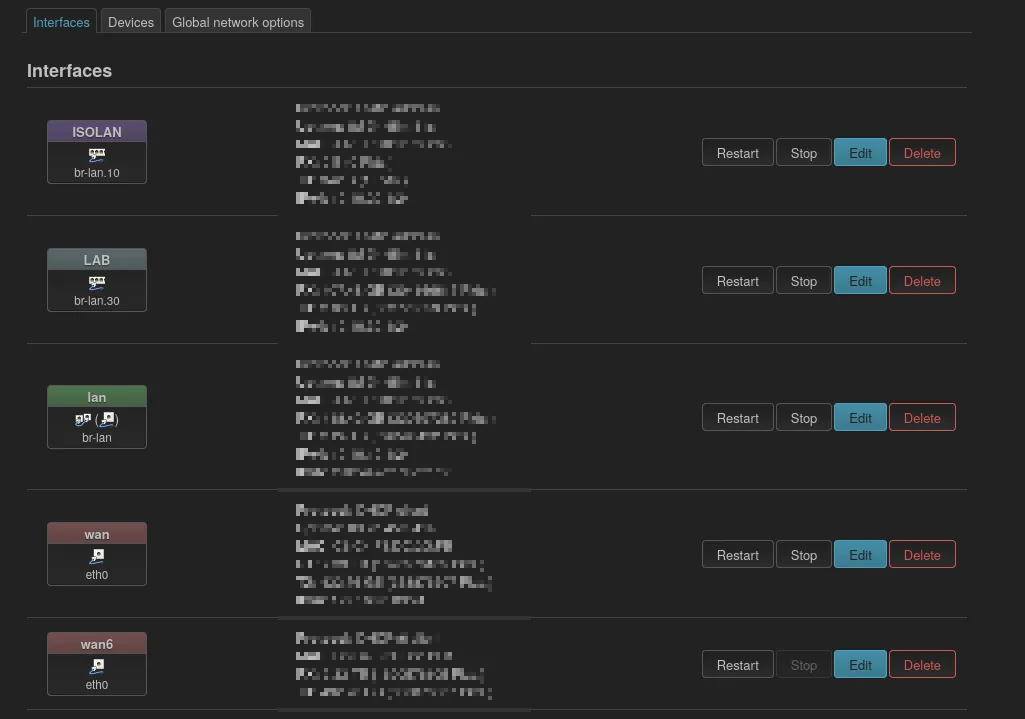
This means that the next time we create a new VM or LXC container, we can place it onvmbr1, with a particular VLAN Tag/idand it will start with the corresponding IP for that network.
Few observations:
- The Luci web UI is much more minimal and to the point. The terminology used for things are more in-line with what I’m familiar with.
- Soon I had the segregation I was looking for thanks to Firewall settings:
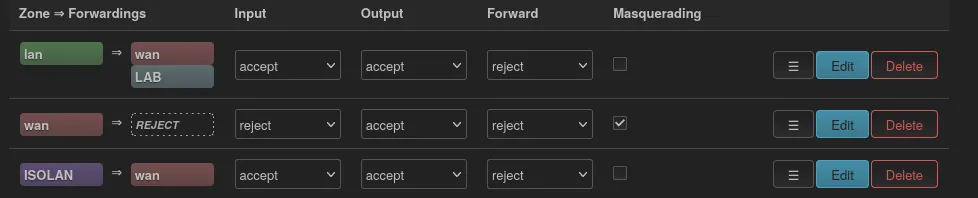
- DHCP, and DNS working as expected.
7.2. Goals: 3
Then I started working on setting up my VPN (Wireguard) remote on my VPS.
- I followed the script from here. Worked flawlessly.
- Added a peer through the script - my OpenWRT VM.
- Setup a domain - eg.
vpn.mydomain.comto point to my VPS’s public IP. - Then I enabled the “DMZ” setting (but not “Advanced DMZ” - which is probably the real DMZ) on my home ISP router settings, and added my OpenWRT VM to it.
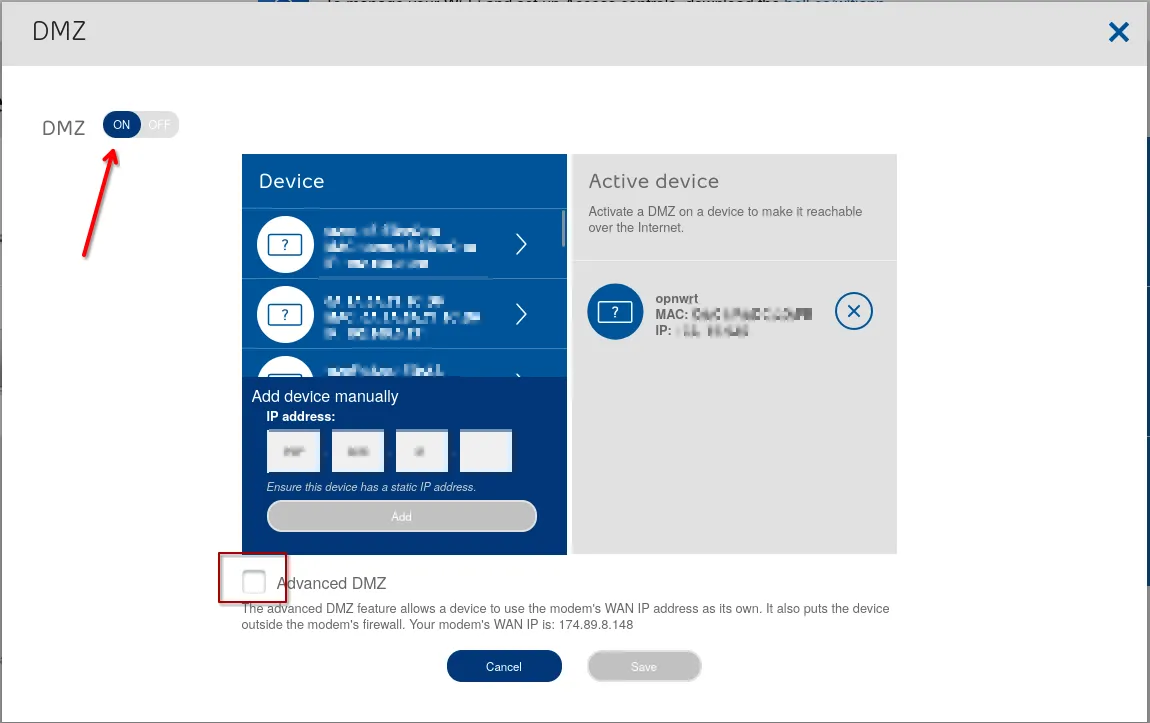
- I also setup a port-forward for the Wireguard port 51820 from my ISP router settings, to point to my OpenWRT VM’s internal port 51820.

After all that, I started setting up Wireguard on OpenWRT.
The corresponding OpenWRT package is called
luci-app-wireguard.This will give you the ability to create a Wireguard interface on OpenWRT.
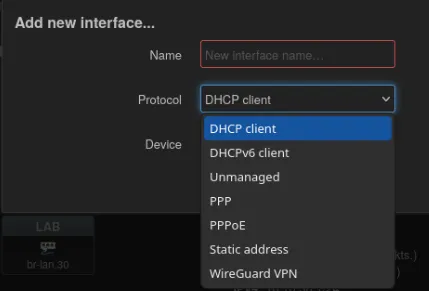
I followed the following excellent tutorial for setting up the Wireguard interface, configured to use my VPS as its peer: Setting up Wireguard on OpenWRT
Created the new interface and added the firewall settings:


As is, this will mean that only LAB will have internet access (using the Wireguard interface) - which is not what I want. I still want other subnets to be routed via WAN.
If only there was a way to route by VLANs…
This is known as VPN split-tunnelling, or Policy based routing.
Luckily OpenWRT has a way to accomplish exactly this with a package called luci-app-pbr. This will add the PBR setting to your menu:

I followed the following tutorial: Setting up PBR on OpenWRT
Set up the rule for my PBR:

The default interface is set to
wan, so everything else should behave as normal: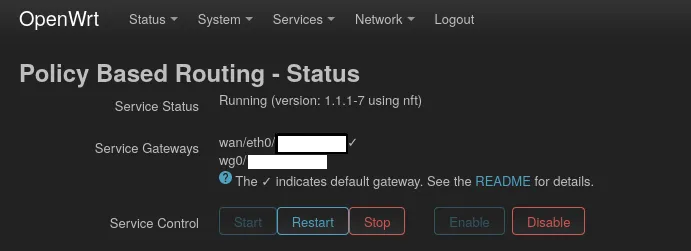
However, it did take many trail & error sessions (see the dns leakage issues section below) to get this working exactly as I wanted.
In summary,
When I create a VM/container in my Lab subnet,
- its external IP is that of my VPS
- when it reaches out to the internet, it goes through the Wireguard tunnel encrypted, to the VPS, and out the VPS’s ISP.
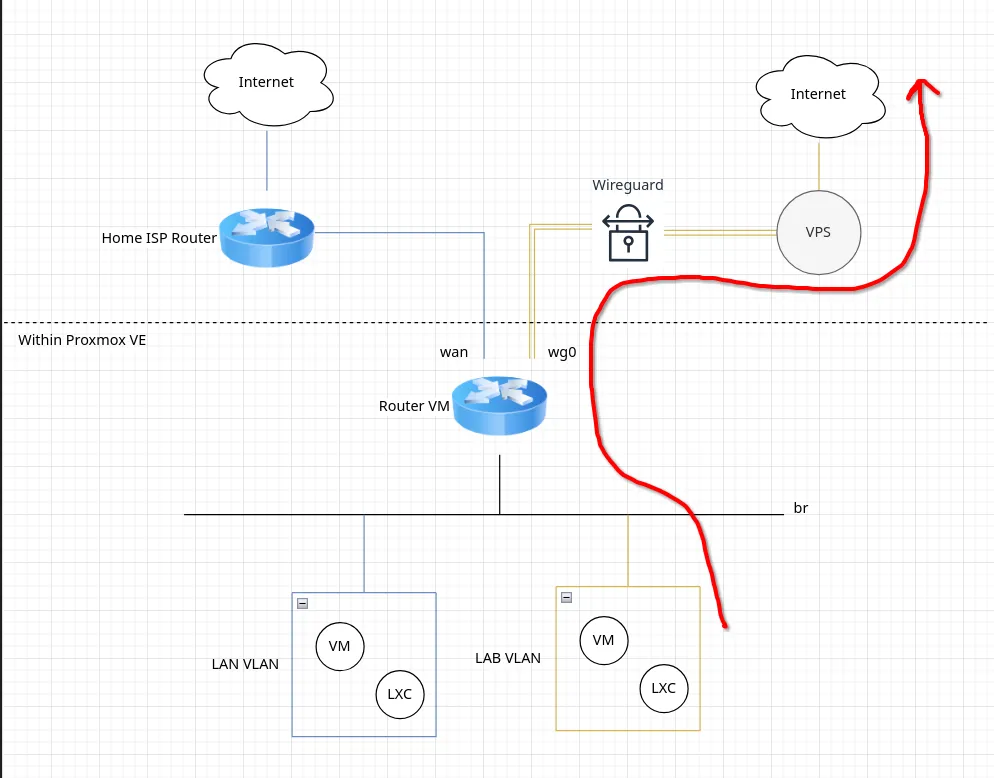
When I create a VM/container not in my Lab subnet,
- its external IP is the same as my home-network’s public IP
- when it reaches out to the internet, it goes through my home ISP (NAT), just like all other devices on my home-network.
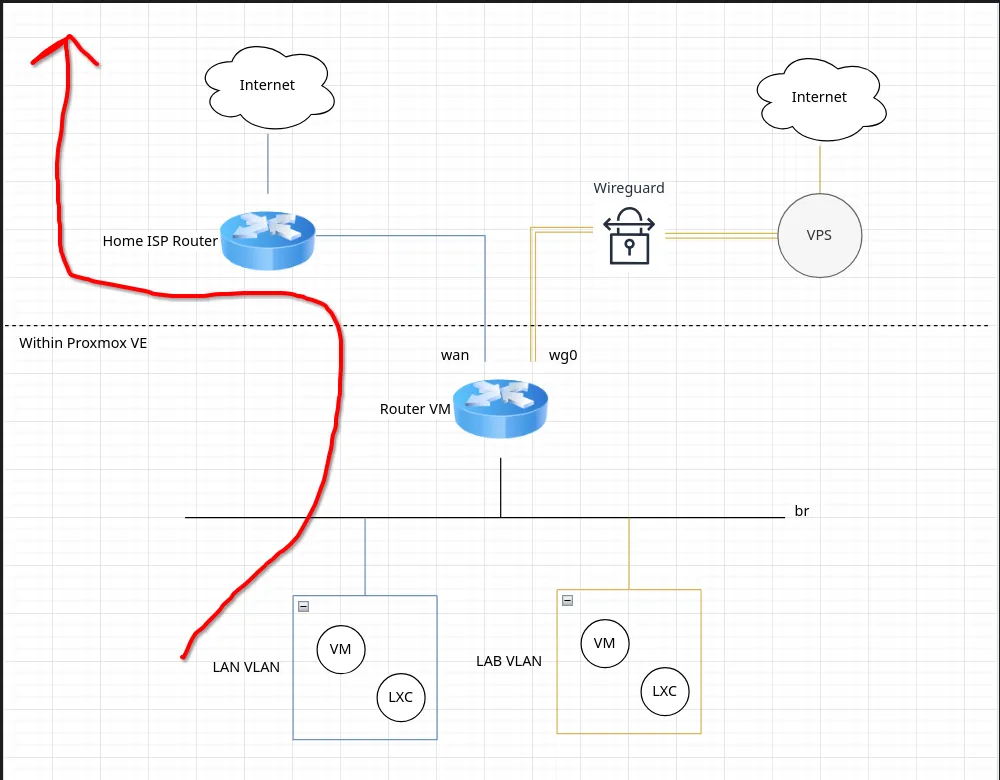
PBR provides quite granular control over this, for example, if you run a Plex server, it frequently needs to access the plex.tv domain. You can choose to route any source going to plex.tv to route via the wan interface instead.
7.3. Goals: 4
For publicly accessible services, I need to point their domains to my VPS. I use sub-domains, so this is just a matter of creating CNAME records for these services.
Then we setup our Wireguard on the VPS to forward all 80,443 TCP traffic to our Wireguard on OpenWRT. We’d need to add these lines in addition to your existing VPS wg0 interface config:
PostUp = iptables -t nat -A PREROUTING -p tcp -i eth0 --dport 80 -j DNAT --to-destination <ip of your OpenWRT wg0>:80
PostUp = iptables -t nat -A PREROUTING -p tcp -i eth0 --dport 443 -j DNAT --to-destination <ip of your OpenWRT wg0>:443
...
PostDown = iptables -t nat -D PREROUTING -p tcp -i eth0 --dport 80 -j DNAT --to-destination <ip of your OpenWRT wg0>:80
PostDown = iptables -t nat -D PREROUTING -p tcp -i eth0 --dport 443 -j DNAT --to-destination <ip of your OpenWRT wg0>:443
Then we also need to setup port-forwards for 80,443 on OpenWRT going to our Reverse Proxy VM/Container.
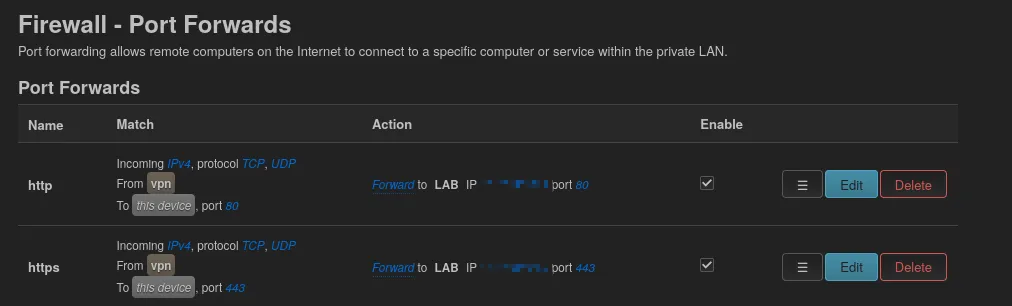
I just setup a temporary Caddy container in reverse-proxy mode to test this out.
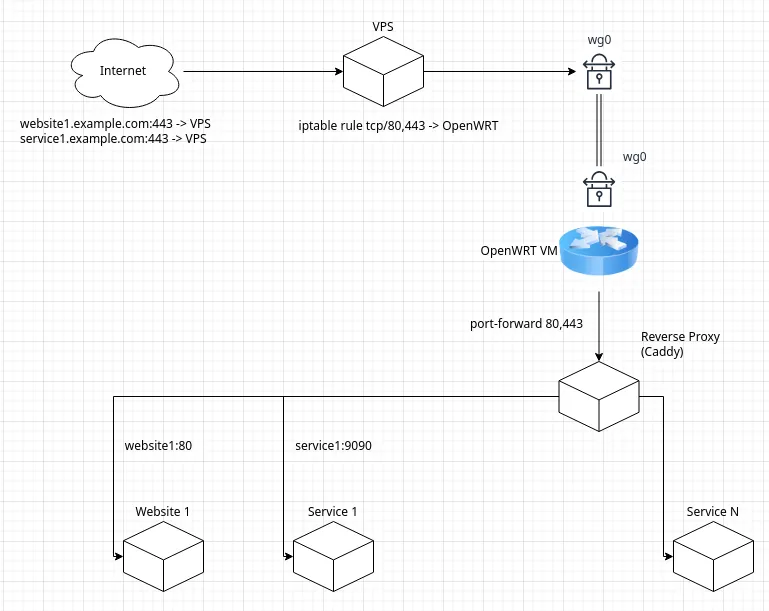
Once this works, we can move on to building out our services :)
8. Home Lab Services
These are some of the services I run ad LXC container:
- Nextcloud - files, and image storage and sharing (thanks to the excellent Memories app). I used the official AIO install.
- Plex - media streaming.
- Vaultwarden - a self-hosted password manager based on Bitwarden.
- A few static websites.
How I set up these services is beyond the scope of this post. You should check out my git repo’s readme for instructions. I will just briefly summarize my process here.
- I use LXC wherever possible as it has lower overhead than VMs.
- LXC or VM hosts are provisioned by Terraform and services are configured by Ansible.
One thing to note is that as of now, there is no automated way to pass-through my iGPU to my LXC containers that would benefit from this - such as Nextcloud (for Memories app), Plex etc.
Instead you must edit the config on Proxmox for the corresponding container, and add the following lines and restart the container. Edit /etc/pve/lxc/<id of your container>.conf:
lxc.cgroup2.devices.allow: c 226:0 rwm
lxc.cgroup2.devices.allow: c 226:128 rwm
lxc.cgroup2.devices.allow: c 29:0 rwm
lxc.mount.entry: /dev/dri dev/dri none bind,optional,create=dir
lxc.mount.entry: /dev/dri/renderD128 dev/renderD128 none bind,optional,create=file
Then inside your LXC container do ls -al /dev/dri/ and you should see some devices.

9. Issues
9.1. Intermittent connectivity loss with Framework
- When I initially started this project, I had already installed Proxmox, and my setup my networking while on BIOS 3.16.
- However every couple of days (sometimes hours) I was observing loss of connectivity to both my Proxmox host, and my virtual router.
- When I plugged in a monitor to see what was going on, I saw a few messages on the TTY regarding
usbX disconnected.... - Unplugging and re-plugging in the ethernet card did not fix it.
- Usually a hard reset was required to bring things back to normal.
I’ve encountered issues with other Framework peripherals in the past, so I reached out to the Framework support folks, and they immediately suggested a BIOS update.
So I proceeded to give that a shot from within Proxmox using fwupmgr:
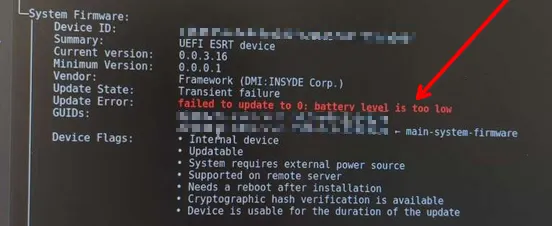
And to my surprise it was complaining about battery level? Its not even connected to the battery…
I brought this up to the support and they confirmed my fear that it was not possible to update the BIOS while having the battery detached. Yikes!
This was a deal-breaker for this whole project, until they confirmed that once I was on 3.17, it would be possible to do future updates without the battery being connected.
So I went ahead and pretty much attached the whole thing back into the laptop chassis
Updated to 3.17, and applied “Standalone operation”
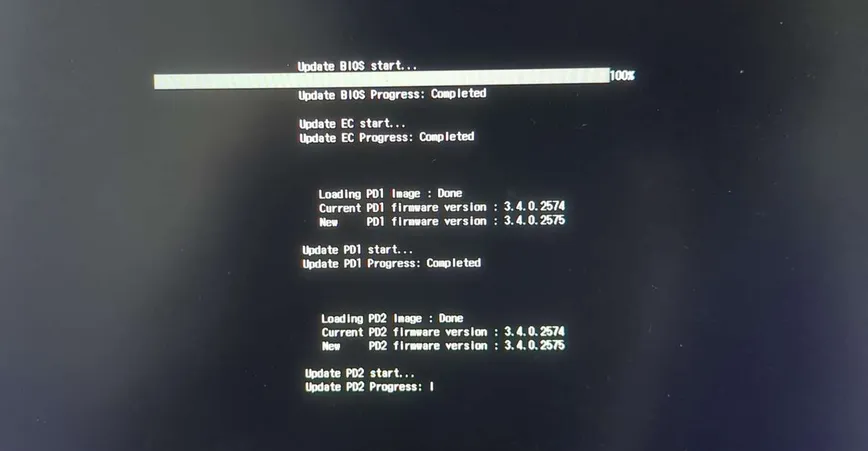
Thankfully, all my connectivity issues have gone away now.
Framework support service is excellent!
9.2. Intermittent loss of internet for hosts in Lab Vlan.
This one kept me up for many nights. To summarize:
- in a host in the Lab network, doing an
apt updatethe first time would hang, mid-way through - running it a few times again, would eventually succeed the operation

Could it be DNS? Could it be PBR? Could it be Wireguard?
After many hours of troubleshooting, I happened to have seen errors during a tcpdump session on my VPN interface.
Something about ...need to fragment.... DOH!
- Lab internet access is via VPN (due to PBR).
- VPN remote interface has an MTU of 1420, not 1500.
- Proxmox
vmbr1set MTU to 1500 by default. - Therefore all hosts in Lab have a MTU mismatch trying to get to the internet.
Fixed. It was not DNS… it was MTU.
9.3. PBR DNS leakage
The whole point having my Lab traffic go through Wireguard is to prevent my home ISP from knowing what I am up to. DNS queries leaking to my ISP completely defeats this purpose!
Although my external IP would correctly report to being my VPS one, tests like this would show that DNS was still being sent to my home ISP.

To fix this, I had to:
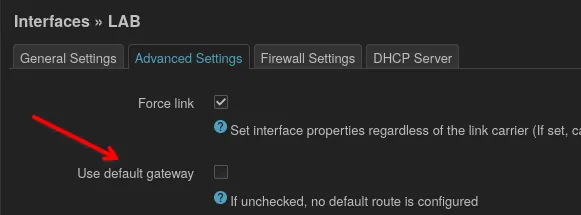
Un-check setting default route on the Lab interface.
Explicitly set DHCP DNS settings for my Lab gateway interface to use my VPS’s
wg0interface IP.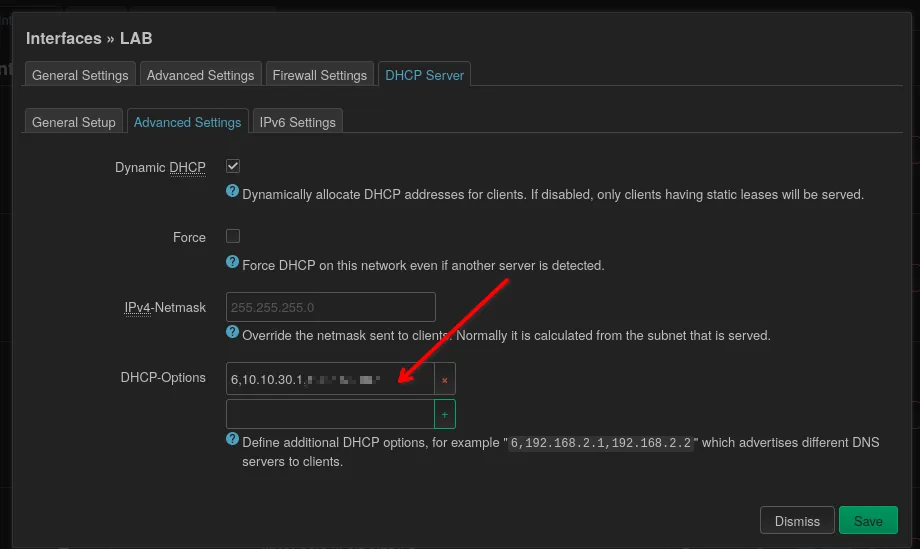
Needed a static route defied for the
wg0interface targeting the VPN network via the OpenWRT local IP forwg0as a gateway.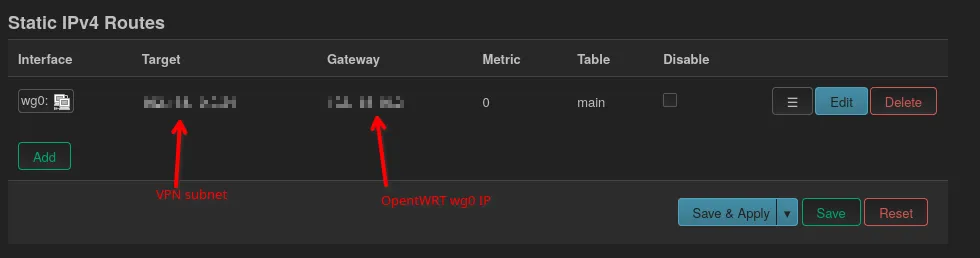
9.4. pfSense
Few observations:
- Segregation was working how I wanted it to.
- A few firewall rules were required to allow access to parts of my home-network - NAS.
- DHCP, worked out of the box.
- However, DNS did not.
I’m still not sure what the issue was, but it was probably something small.
More importantly, I was quite overwhelmed with all the options in the UI for which I had no knowledge of.
Also, everything in pfSense pretty much requires a UI, which for now is fine, but I’d like the option to move to a more automation friendly configuration in the future.
10. Summary
The Framework laptop is happily fulfilling its destiny as a compute server, and so is my NAS as a storage server.
Since switching to this setup, I’ve observed a dramatic improvement in responsiveness for all of my services.

Overall I’m quite pleased with how everything turned out once the appropriate BIOS was running on the Framework.